As an Event Publisher, you can create and immediately publish events for your Department or Organization. Event Publishers have an array of choices for classification, a powerful way to ensure your events are shown to the calendar users who are most likely to be interested in them.
Account Setup
Setting up your account is simple.
- First head over to https://www.campuscalendar.ucsb.edu/admin and log in with your UCSBNetID.
- Once that’s completed, send an email to Campus Calendar Admin and let us know the department(s) you will be adding events for.
You can specify multiple people to post events for your department as long as they have a netID. They would each need to follow this first step. Once that’s done, you’ll be able to return to that same link and see a completely new interface.
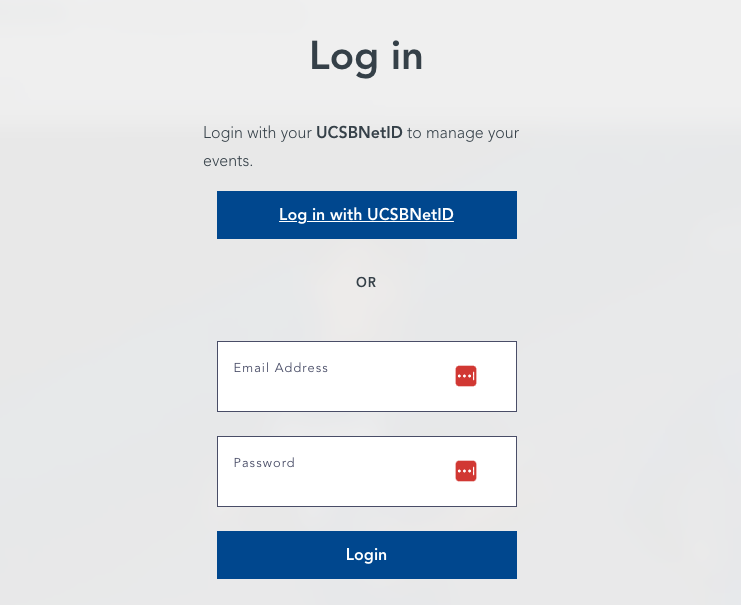
Remember, you will need to use your UCSBNetID to log in to your account at campuscalendar.ucsb.edu. Your account also needs to be capable of accessing the event management tools—if you see “Administration” in the menu after you’ve logged in, you know that you have this level of access.
If you do not see it in the menu, either you need to contact the Campus Calendar Admin, or you are logged in with a different account (such as your personal email).

Add an Event
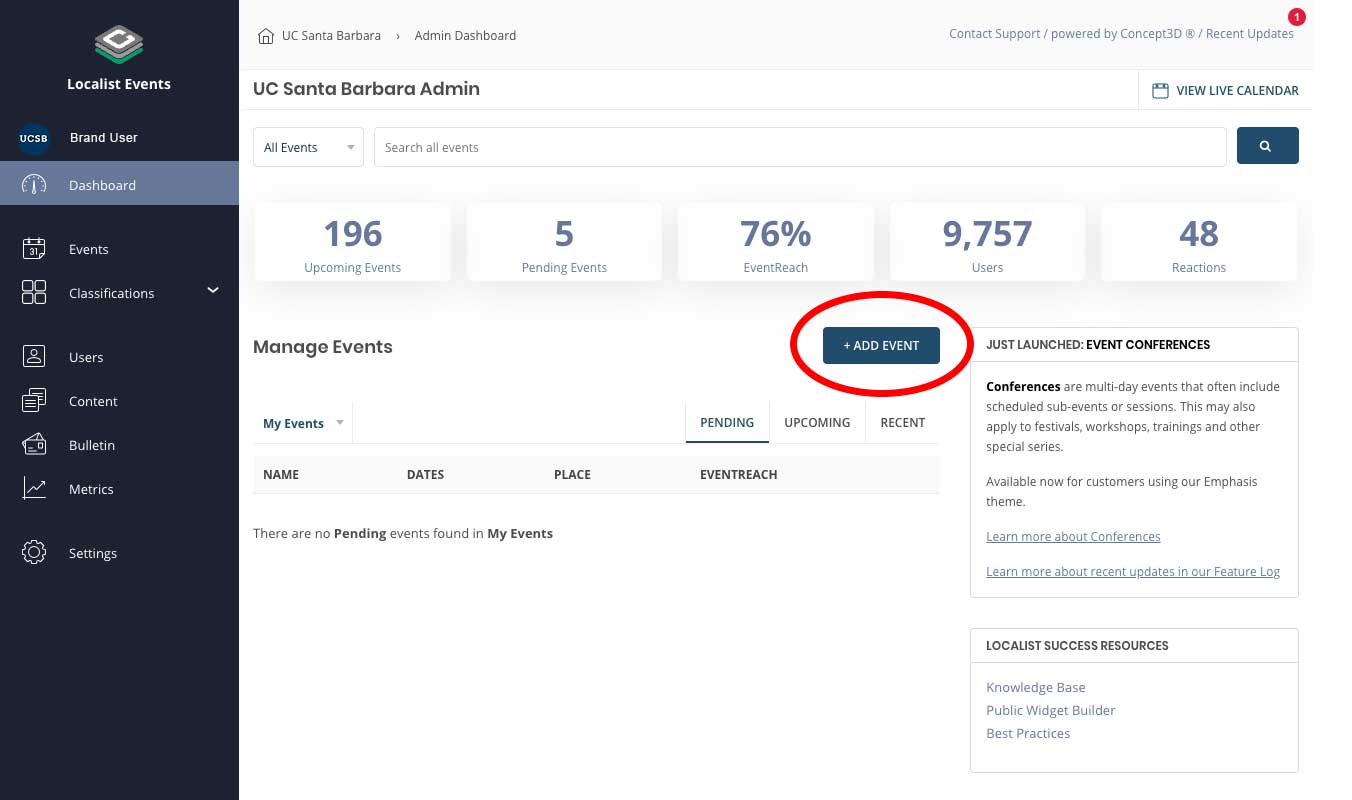
To create or edit an event, log in to your account by clicking Login at the upper right corner of the Campus Calendar site. Once logged in, select Administration from the dropdown menu to the right of your avatar. Click the Add Event button to create a new event. To edit an existing event, click on the title of the event in the Manage My Events section. This will open the event editing form for that event.
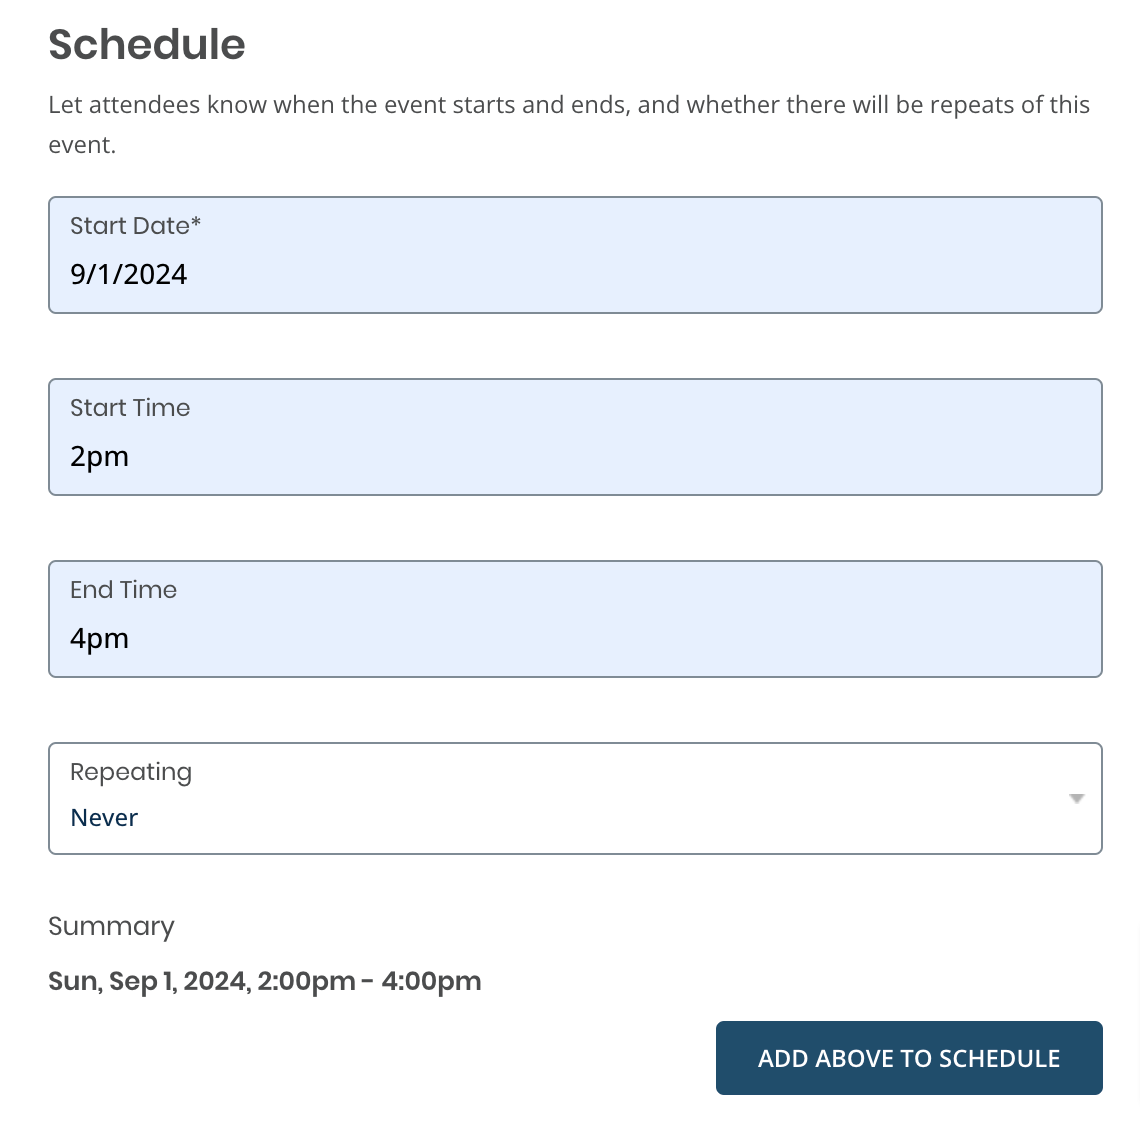
Schedule
When creating an event, you will see a Schedule section that contains all date-related details. As soon as you enter a valid start date, you will see the Summary updated to reflect the field data as well as the Add Above to Schedule button activated.
Once you have completed all of the fields, confirm your schedule in the Summary then select the Add Above to Schedule button. The dates will now be listed below in the Confirmed Dates section. From there you can delete or edit the times for individual instances.
Schedule Tip 1
Add events at least 7 days before the start date.
DON’T wait to add them until the last minute.
Schedule Tip 2
Use Recurring when there’s more than one instance of an event.
DON’T create multiple submissions.
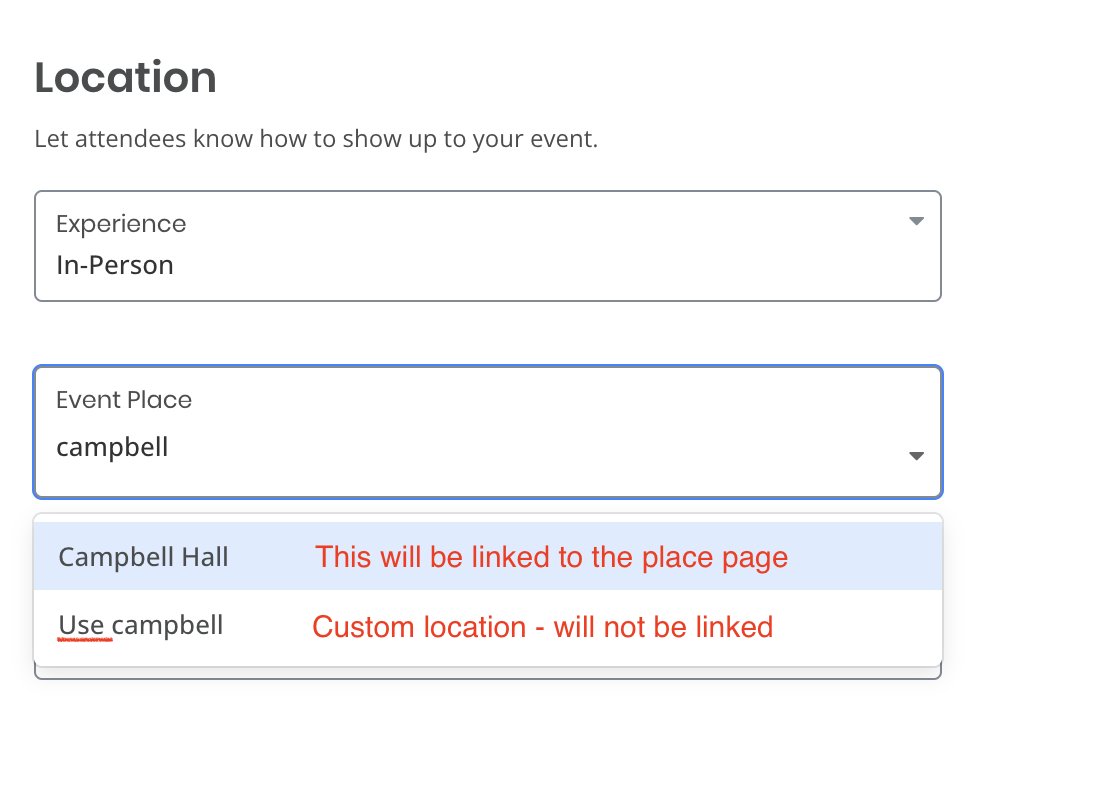
Location
Experience:
Localist offers the option to select In-Person (default), Hybrid, or Virtual as an event Experience. Selecting either Hybrid or Virtual will expose three additional fields. If you select Virtual the physical location fields will be hidden.
Event Place:
In the Event Place field, start typing the location—building name or landmark, and you will see the location options that are available on the Interactive Campus Map.
- Use: By selecting this option, you will not connect to a Place Page, instead, you'll be using a custom location.
- If Use is not displayed before the name, it means that what's listed is in the database as a Place Page and will integrate with the Interactive Campus Map.
If you select to use a custom option, such as Use: Campbell as shown, then fields for Address and Directions will appear for you to fill in.
Can an event be hosted at two Places?
Nope! An event can only be hosted at one Place in Localist.
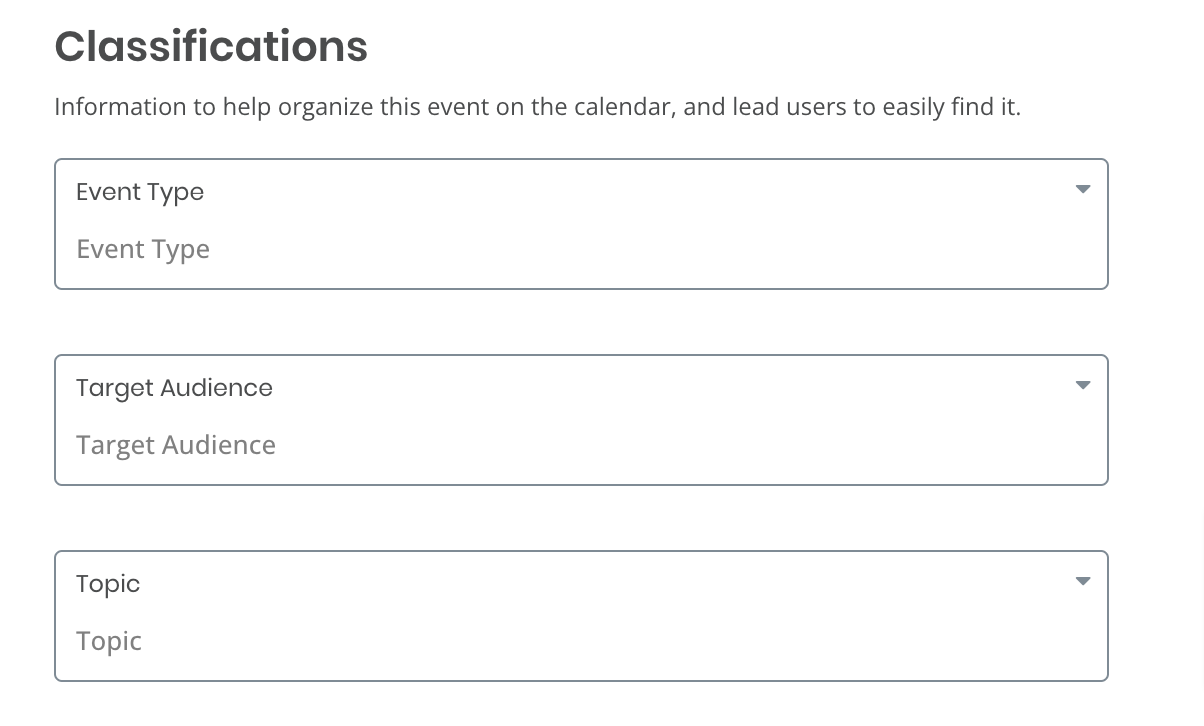
Classifications
The Classifications section features three dropdown menus, all with predefined selections. Filters provide Users with information surrounding the format (Event Types), the information covered (Topics), who can attend (Target Audience) and help ensure that calendar visitors have a number of ways to organically find your event. DON’T leave the Classification section empty.
Tags & Keywords
Tags & Keywords are great for short-term categories, ultra-specific categories, promoting, or for SEO purposes. Tags & Keywords are both free-text labels and are not selected from a pre-determined list. Tags are publicly displayed on the event details page and are useful if the classifications above (target audience, event type, Topic) are not sufficient to describe your event. In comparison, Keywords are hidden from the public and only seen by search engines. View more detailed information on Guidelines for Tags & Keywords.
Tags:
- Display publicly
- Group like-events
- Narrow down the subject
Keywords:
- Hidden
- SEO & Misspellings
- Widget & Channel Filtering
Are Tags & Keywords case-sensitive?
Both Tags and Keywords are not case-sensitive. So for example, if you use the Tag "free" and the Tag "FREE" they will be seen as the same regardless of the case.
Can I use special characters with Tags and Keywords?
Yes! However, there is an exception with the ampersand (&). While you can include an ampersand in a Tag or Keyword, it’s not possible to use the ampersand in the Tag/Keyword search field in the Widget Builder.
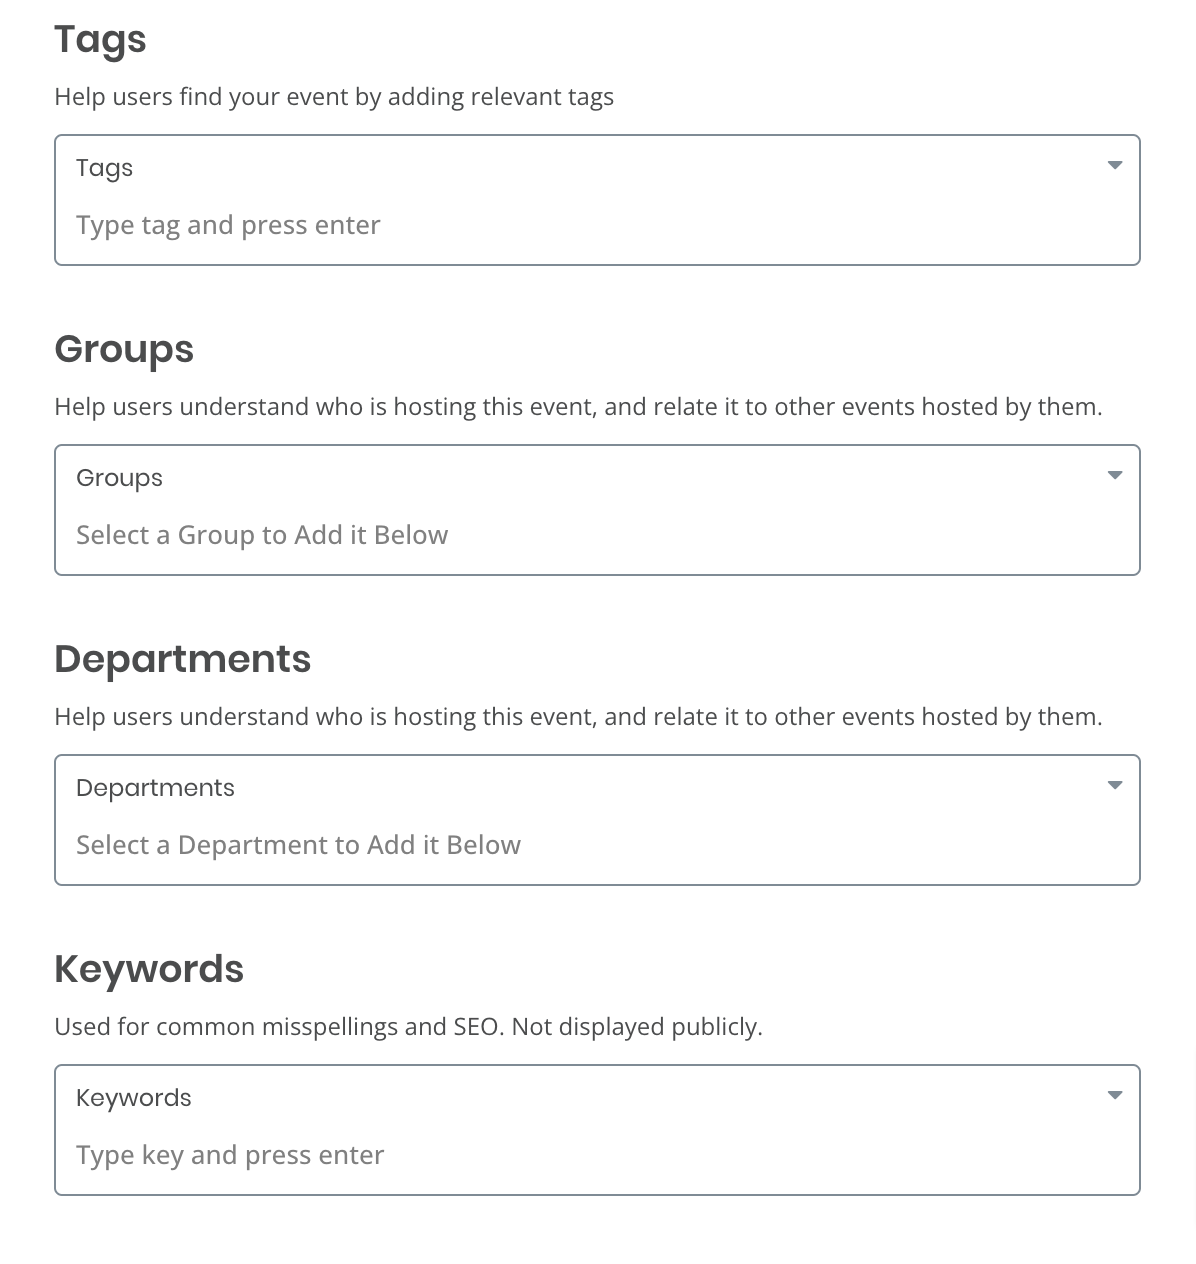
Group & Department
Groups & Departments provide users with context around who is hosting your events. Users can search via a particular Group or Department, or as a quick way to obtain extra information. Groups and Departments are used to bring distinct audiences together by highlighting events that happen at different places but share a common host. Each Group & Department has its own landing page where users can see both upcoming and recent events, can follow the page, and view information like social media accounts, description, and website links. Beyond just serving as another means to classify events, they're a huge SEO boost!
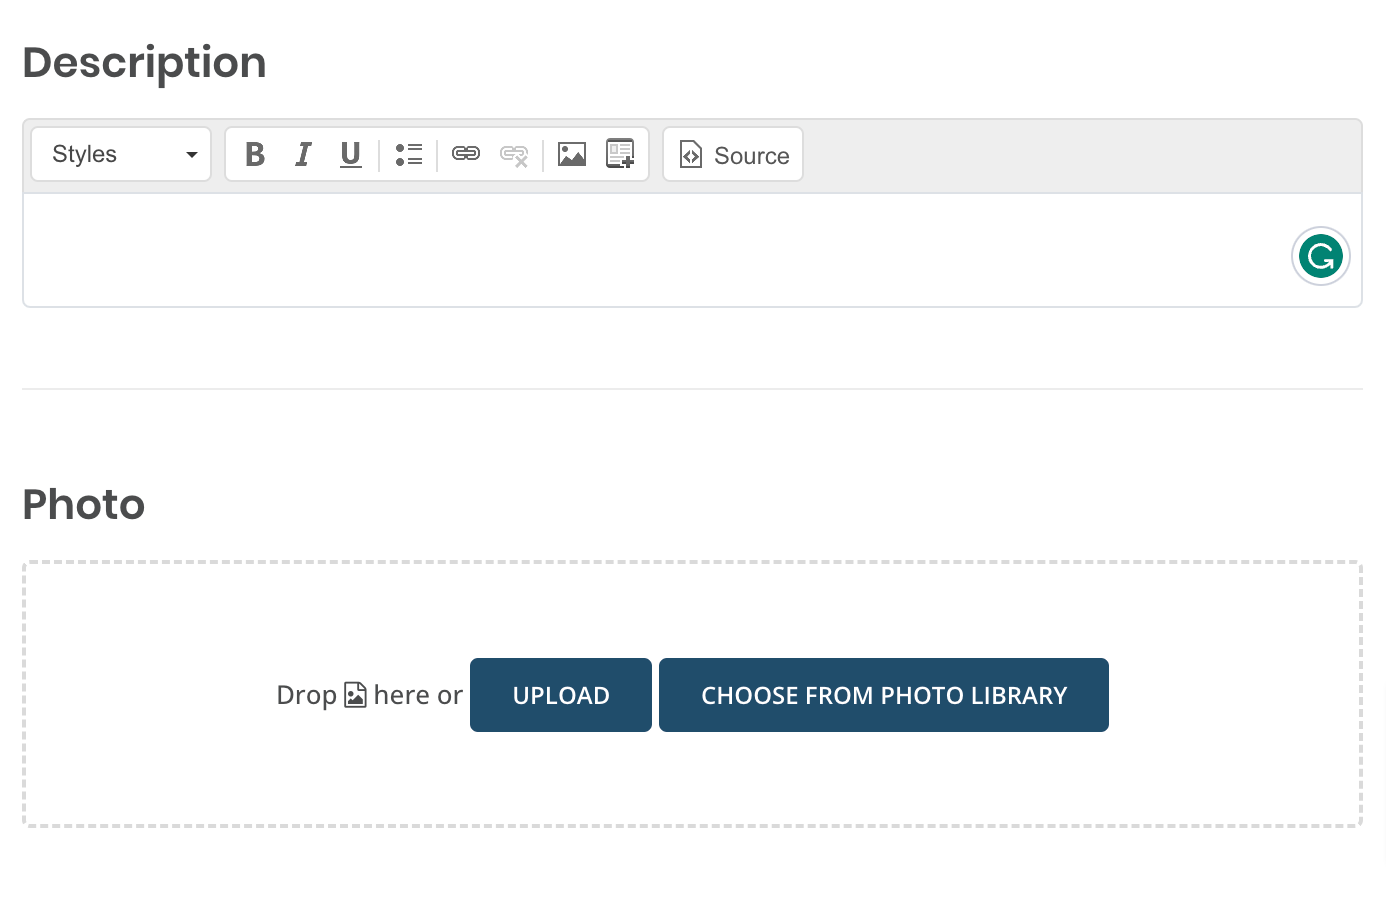
Description
Description fields are required and should contain all of the essential information describing the event. There are no character limits, and HTML tags are supported.
Photo
Every event should have a photo that is easily recognizable. These photos appear on event detail pages, event listing pages, and other places, such as email digests sent to Event Seekers. We’ve added a few generic photos to the Photo Library for your use; however, we encourage all Event Publishers to provide their own unique images to help them stand out and create unified messaging across your various channels.
Photo Best Practices
- Photos should be, at a minimum, 940 x 557px
- The bigger, the better (Maximum size is 5000 x 5000px)
- Rectangular photos will translate better than square photos
- Avoid a flyer or text-heavy photo
- If you must use text-heavy photos, aim for the text to be as close to the center of the image as possible
- Avoid photos with too much white space
- Accepted formats: PNG JPG, GIF
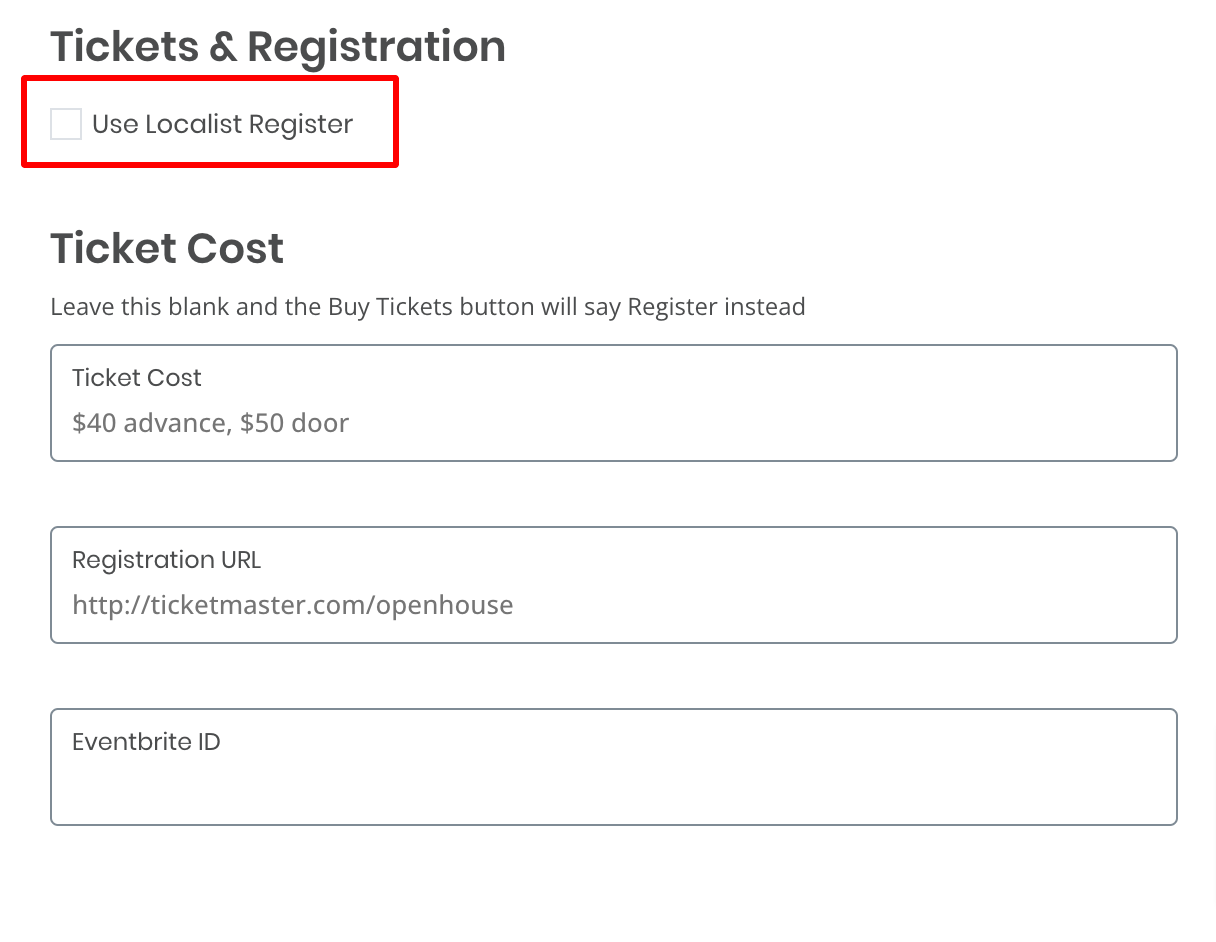
Tickets & Registration
We are NOT offering the ticket payment option for your paid events on the Campus Calendar platform due to our PCI Compliance requirement. However, you can use the Tickets & Registration option for your FREE events. More information about adding a ticket.
If you have your own registration process outside of Localist, you can uncheck the "Use Localist Register" option, and you will be able to enter your registration URL.
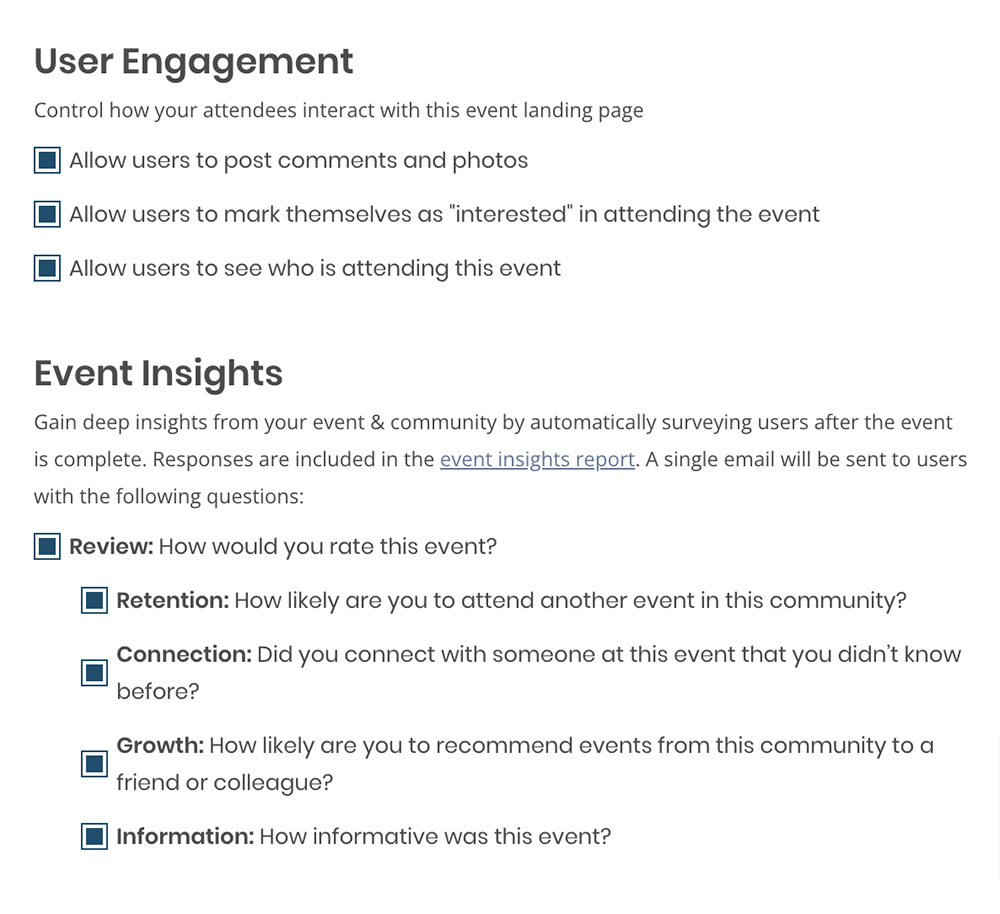
User Engagement & Event Insights
You can control how your attendees interact with this event landing page with the User Engagement options. Only the "Allow users to mark themselves as "interested" in attending the event" option is available on our Campus Calendar at this time. User's comments, photos, and attendee list will NOT be publicly displayed on the event landing page regardless of your selection.
If a user selects I'm Interested and/or registers for an event via Localist Register, the user will receive an email prompt to review the event within 2 hours of the event concluding. The user will have the option to select a 1-5 star rating and then will be taken to the event page where they will be prompted to provide additional feedback via a series of questions that you opted for at the Event Insights section.
Once submitted, the user's feedback will be shared anonymously and included in the event's Insight Report. The Insight Report is available on a per-event basis by navigating to an event's edit page then selecting Metrics > Insights:
Visibility
You can limit the visibility of your events by making selections in the Visibility section. Here’s how the different Restricted options work:
- Unlisted: The event will not be listed on the calendar and will only be accessible through the event URL
- Restricted:
- Widgets: Event will only be visible on widgets and not shown on other calendar pages
- Place Pages: Event will only be visible on place pages and not shown on other calendar pages
- Channels: Event will only be visible on channels and not shown on other calendar pages
- Logged in users: Event will only be visible on logged in users
For more information about event visibility, see 4 Ways to Host Private Events and Visibility.
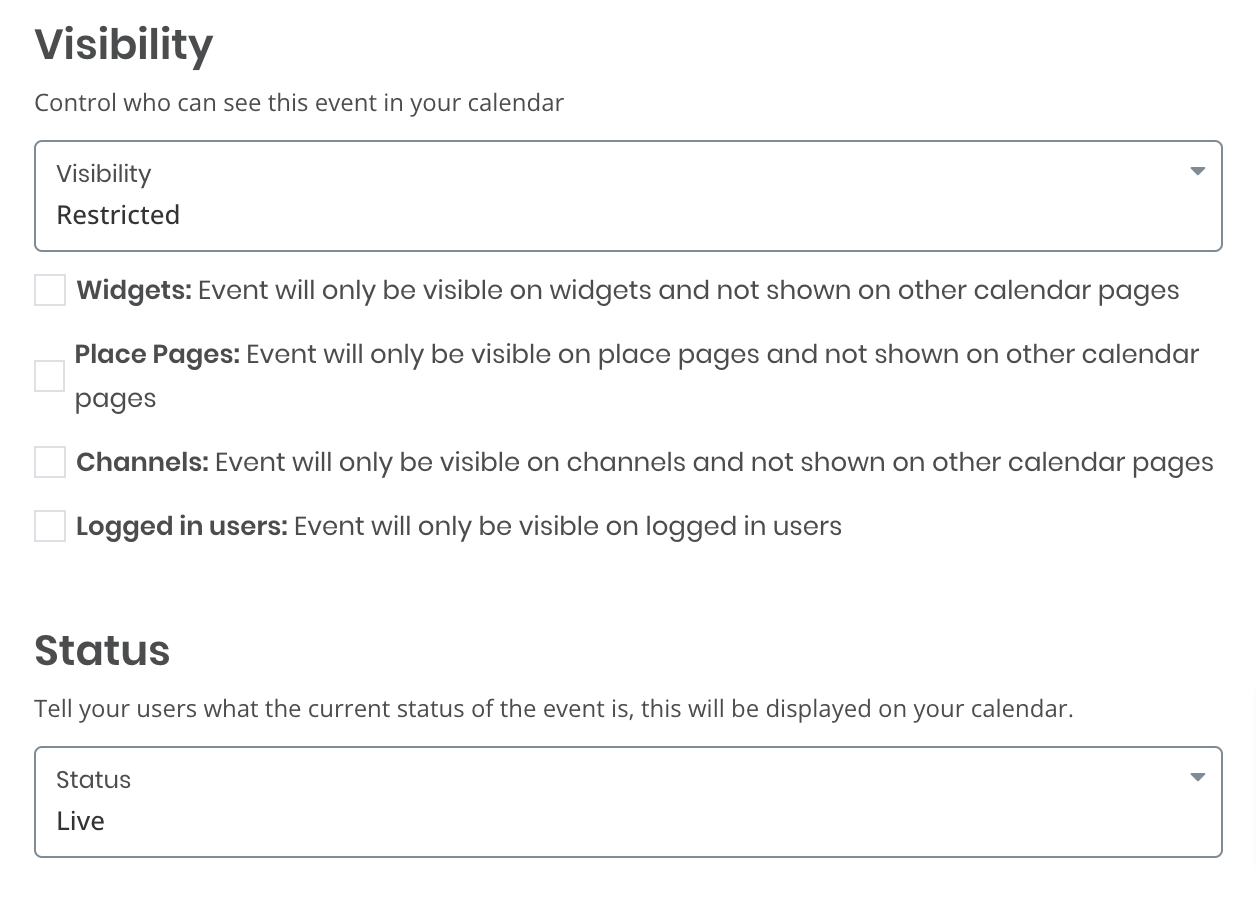
Status
By default, all events in Localist are considered "live." If you have a change of plans do not delete your events! Using Localist's built-in status option will ensure that your community is as up-to-date as possible when browsing your events. If you select Canceled, Postponed, or Sold Out, the word will be appended to the beginning of the event's title on the listing and details page.
Promote your Event
Localist offers several tools to help you promote your events. These tools include Channels, Widgets, Localist API, and RSS Feed - each of which provides different approaches to event promotion, and user discovery.
Channels:
Channels are a Promotion tool that pulls your events based on already existing Classifications (Filters, Places, Groups, Departments, Tags, and Keywords), or date ranges to showcase them in one place, within our Campus Calendar platform. Channels are designed for short-term events like festivals, or topics that have many different components but one theme.
Channels are highly customizable with drag-and-drop components so you can make them have a different look and feel than the rest of our platform.
Channel Ideas:
- College to collect the events for all its Departments
- Parents & Family Weekend
- All Gaucho Reunion
Interested? Contact Campus Calendar Admin.
Widgets:
The simplest way to add a feed of events from the Campus Calendar to your website is to build a widget. You just need to copy a code snippet generated by the Widget Builder onto your web page - no web skills are needed. The widget is a “live” connection to the Localist database so any changes to event information will be reflected on your site’s display.
To start, go to the Widget Builder page:
- UCSB Templates: Five branded templates are available for you to use - card (large, small) and list (default, tile, no image.) See the UCSB Template samples.
- Number of Results: This selection determines how many events you want the embedded widget to display. The maximum is 50. You may want to adjust this to a number that works best with the template you’ve selected above.
- Days Ahead: This selection tells the system how far ahead to look for events that fit your selection criteria. 365 is the max. You can enter a negative number to show past events.
- Content and Excluded Content: The next two groups of fields allow for very fine-grained control over exactly what events display within your embedded widget.
API:
The Localist API requires technical knowledge. Events are pulled with standard HTTP calls, and the Localist API returns raw JSON data that is not formatted or styled. Your team will be responsible for styling the presentation, as well as building the application that can ingest and parse the JSON data.
- Localist’s API is read-only and publicly accessible.
- Calls will pull 10 items per page by default, but can be increased to up to 100 per page (this is well-above industry standard).
- The maximum date range that the API call pull from is 370 days from today or the start date you specify.
- If a start date is not specified, then the API will default to only pulling event data from today.
RSS Feed:
Really Simple Syndication (RSS) is an XML-based format that can be accessed with “news reader” applications, embedded in blogs, and used in other ways.
You’ll use the Widget Builder to create your custom RSS feed. The filtering controls in that tool allow you to get very fine-grained to display exactly what you need on your feed. A couple of settings to take note of:
- It does not matter which template you choose at the top of the Widget Builder. RSS feeds do not make use of widget templates. You can leave that setting at Default.
- By default, feeds only include the next instance for recurring events. If you’d like to include all instances within a date range then you can select the Include All Matching Instances option.
At the bottom of the form, click Preview Widget to make sure you’re displaying your desired results. In order to change the display from the HTML widget to an RSS feed, you’ll have to make a small change to the URL in your address bar. Look for format=html and change it to format=rss, then hit enter or return on your keyboard to refresh the page. Select and copy the URL. You’ll use this in your RSS reader, widget, or wherever else you’d like to display your custom feed.
Questions?
Contact Campus Calendar Admin